Enhanced Services
Enhanced Services allow users to fully adjust settings like Caller ID, Do not Disturb, Call Pickup, and Call Forwarding etc.
Enhanced services are ordered by priority (top to bottom) a higher priority equals higher precedence of the enhanced service. For example, due to the similarity of ‘Follow Me’ and ‘Group Hunt’ services, if both are enabled, ‘Follow Me’ will be executed due to higher precedence and not the ‘Group Hunt’.
Each service has two or more accessibility options:
- Unavailable:
-
- Available:
-
- PIN Required:
-
To enable specific service, press select button next to available icon for that particular service and click save. If service requires additional settings edit button next to it will become available. Pressing edit button will open up a window with additional options for that specific service.
If PIN required is selected, to use the service the user will have to enter the PIN assigned to their extension beforehand.
Enhanced services can also be administered by an end user through their customer self care portal. If the Star symbol (
Contents
- CallerID
- Call Pickup
- Last Caller
- Operation Times ( Extension )
- Call Filters & Blocking
- Do Not Disturb (DND)
- Call Screening
- Call Forwarding
- Follow Me
- Group Hunt
- Mobile Numbers
- Speakerphone Page
- Speakerphone Page Groups
- Directory / BLF List
- Speed Dial
- Instant Recording
- Delete Recordings
- Listen to Recordings
- Remote Access
- Call Monitoring
- System Operation times ( Main System )
1. CallerID
The CallerID section of Enhanced services can be used to change the outbound number that is presented on external and internal calls.
To change the number presented on outbound (Trunk) calls, the “Trunk CallerID and Privacy header” fields need to be changed. These fields can also control privacy mode (for anonymous calls).
Breakdown of all the fields and what they do:
- System/Network Caller ID
- Information provided here will replace the default Caller ID information on a local level By default this will display the Extension number and name but if anything else is required you can change it here.
Note: It is best practice not to change this section as it will stop the local extension and name from being presented on internal calls.
- Emergency CallerID:
- CallerID entered here will be used only for calls to Emergency Services numbers.
- Allowed list of CallerIDs (via App and Access Code)
- You can add list of CallerIDs that you would like to allow to be used for outbound calls. This option can be used from The IPVoice App by simply selecting caller ID number from the list in your App client.
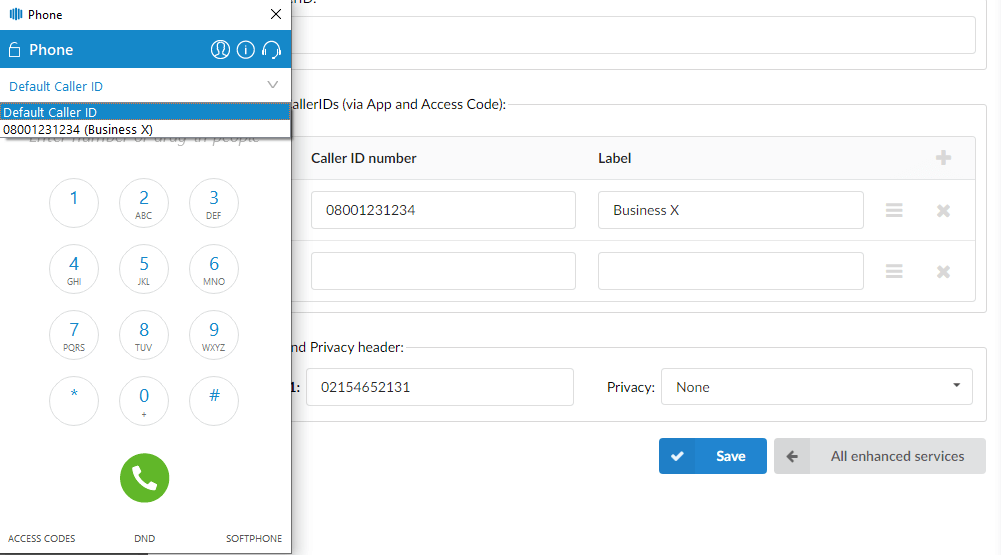
Although, this option is impractical to use on the deskphone itself you can still use it by entering *65*[Caller ID number as entered in the list]*[Number you wish to dial] on your dialpad.
For example;If you have a Caller ID number 02033998700 added to this list, and you would like to dial number 0019542798470 using this caller ID you would have to dial *65*02033998700*0019542798470.
Tip:
A prefix key can be used to achieve this easier (Yealink Only)
- linekey.25.label = Key name
- linekey.25.type = 40
- linekey.25.value = *65*Number to present here*
- Trunk CallerID
- For each trunk available on the system, there will be a field in which you may set a custom Caller ID that is used when calling over that specific trunk.
- Privacy
- What anonymity to use when setting CallerID on a trunk. If selected option contains Privacy ID that field will be added to SIP header.
- Anonymous – puts “anonymous ” in trunk CallerID field, which means that CallerID name and number will be anonymous when dialing out of that trunk.
- Anonymous with Privacy ID – Same as above but adds Privacy ID to SIP header.
- Anonymous with number – Set anonymous CID name but allow showing number.
- Anonymous with number and Privacy ID – Same as above but adds Privacy ID to SIP header.
2. Call Pickup
This service enables the extension to pickup other extensions calls by pressing the Gpickup key on their handset (visible after picking up the reciever), a flashing BLF key or by dialling the *8 pickup access code.

Example setups:
For example, if you wanted the extension you are on to be able to pick up every phone in the office, you would go to the advanced options and set the call group and pickup group for every extension to be the same. This will give the handsets the permissions needed to pickup any ringing handset.
Another example scenario:
- Extension A:
-
- Call Group = 1
- Pickup Group = 3,4
- Extension B:
-
- Call Group = 2
- Pickup Group = 1
- If A is ringing, B can pick up the ringing call by dialing ‘*8’ or pressing their BLF key for Extension A.
- If B is ringing, A cannot pickup the ringing call because B’s call group = 2, and A can pickup only call groups 3 and 4.
3. Last Caller
This service will dial the last extension that was calling you. For example, dial ‘*149’ to hear the extension number and then press ‘1’ to call that number.
4. Operation Times
Operation times can be set at an extension level. They are used for time based routing for inbound calls on an extension level.
More information on Operation times can be found here:
5. Call Filters & Blocking
This service filters and blocks all incoming calls based on a set of rules and is most commonly used as a blacklist or priority list. For example, calls can be filtered based on whether they are anonymous or belong to specific caller or telemarketer.
When a call comes in and has a match on the server, it is handled in a way defined by the Destination Type selection box.
For Anonymous callers:
- Call Forward
- Incoming call is forwarded to a given number in the Destination field.
- Privacy Manager
- To reach you, anonymous caller must set their CallerID.
- ‘Always Busy
- You are always busy for anonymous callers.
- Voicemail
- Anonymous caller is forwarded to a given extension’s voicemail.
- Not in service
- Called number is ‘Not in service’.
- Ring Tone
- With this option, it is possible to set a custom ring tone for anonymous callers (or known ones, too).
- See the How To – Custom Ringtones Article for more information.
For specific extensions:
- Call Forward Number
- Incoming call is forwarded to a given number in the Destination field.
- No Answer
- Incoming call isn’t answered.
- Busy
- You are busy for incoming calls from this extension.
- Voicemail
- Incoming call is forwarded to a given extension’s voicemail.
- Not in service
- Called number is ‘Not in service’.
- Ring Tone
- With this option, it is possible to set a custom ring tone for this caller.
- See the How To – Custom Ringtones Article for more information.
6. Do Not Disturb
Do not disturb, or DND is a common feature that stops incoming calls to an extension. It can be enabled by pressing the DND key or by dialling *78 to enable and *79 to disable the service.
The feature can be configured to redirect incoming calls to a specific destination (local extension or mobile number, or to an extensions voicemail.
Once the call forwarding has been set up on the portal, the rules will be applied when enabled/disabled.
The following example setup below will forward my calls to the mobile number given whenever DND is enabled.
7. Call Screening
As the name suggests, if this option is turned on in Enhanced Services of an extension, it will offer Call Screening for that extension. Incoming calls will be presented with a choice of either saying their name and waiting while the call is presented to the destinations set, or to leave a voicemail to the called extension.
For Call Screening to work, it must first be enabled in the Enhanced Services of the extension and at-least one destination must be set.
When someone calls the extension, the caller will be presented with a choice:
-
- Say your name and wait while the call is being made to one of the destinations in the Call Screening
- Leave a Voicemail to the called extension
- If a caller presses ‘1’, he will say his name and destinations in Call Screening will ring at the same time for the time defined in ‘Timeout’ field . If no one answers the call, the original caller will go to the “Last Destination” set in the Call Screening options.
- If a destination answers the call, the person answering the call will be presented with the name previously recorded by the caller and the following options:
-
- If you press ‘1’ the caller will be connected to the answering destination.
- If you press ‘2’ the caller will be able to leave a message to the called extensions voicemail.
- If you press ‘3’, you will be able to send a call to another phone number.
- If you press ‘4’, you will say a short message explaining why you are unavailable for example, and that message will be played to the caller after which they’ll be able to leave a voicemail.
- Destination
- Number(s) which the Call Screening will call.
- (ex. 1004 & 1005)
- Timeout
- Number of seconds during which the Destination(s) will ring.
- (ex. 32)
- Dial options
- Additional dial options when calling the Destination(s) (See dial options article for full list of Dial options)
- Dial Type
- Simultaneous – All set destinations will ring at the same time.
- Sequental – Each destination will ring one at the time, after the timeout call will move to next destination in line.
- Preamble
- Preamble will play pre-recorded message before greeting, if selected from the drop down list. Message file name have to start with “pivr-” in order to be displayed in the list.
- Greeting
- Here you can select a custom greeting message for your Call Screening. The message file has to start with “pivr_” and has to be uploaded to the sounds folder.
- Pause before recording (sec)
- Number of seconds to pause before the recorded caller name is played.
- Max recording length (sec):
- Max length of recording in seconds.
- Last Destination
- This is the last destination that is called if all others from the ‘Destination’ list don’t answer.
- (ex. 8877)
- Is Voicemail
- Whether Last Destination is Voicemail.
8. Call Forwarding
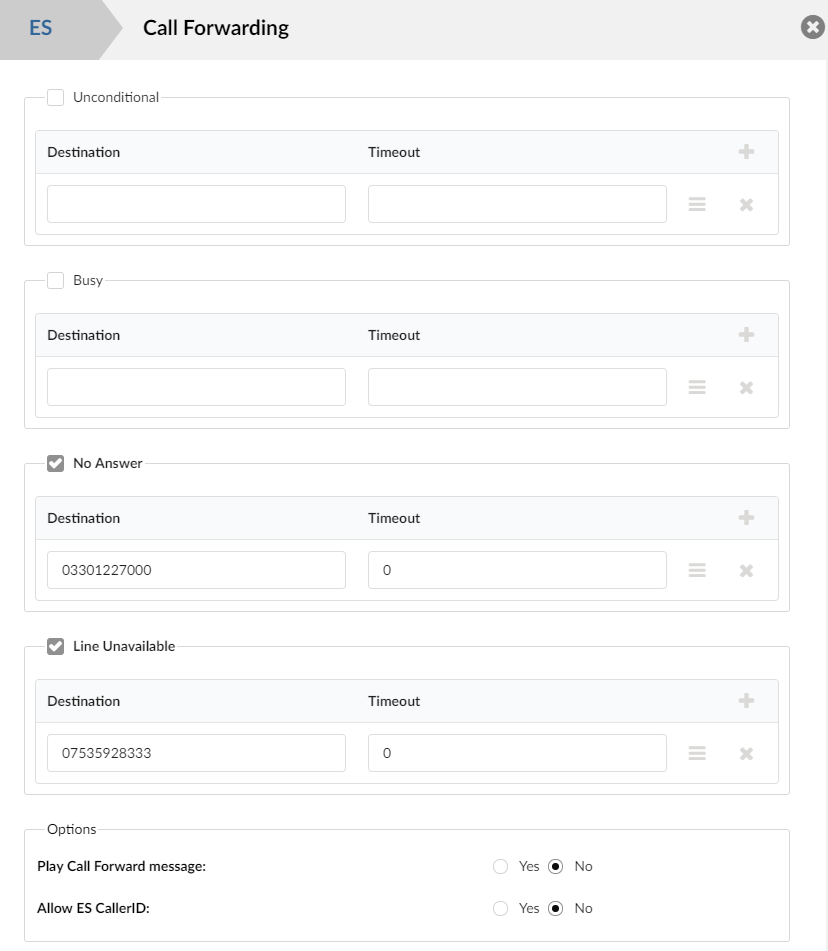
This service forwards calls to other extensions depending on the extension status, the destinations set here can either be a local extension number or a full Geo/mobile number.
Unconditional:
Unconditionally forward calls, no matter the status of the handset. (useful for temporary diverts)
Busy:
Forwards calls when the extension has no more inbound channels left, either because the limit has been reached or call waiting is disabled on the extension.
No Answer:
Forwards calls after the “Ringtime” that is set in the extensions has been exceeded. (default 32 seconds)
Line unavailable:
Forwards calls when the system cannot see the extension online (Disaster recovery)
TIP: The “Timeout” option is the amount of time it will call the destination for, not the timer that the extension will ring for before the forwarding kicks in.
- Play Call Forwarding Message
- Notify users of a transfer being made.
- (ex. If this option is set to ‘Yes’, the caller would hear a ‘Please wait, your call is being forwarded. You’re not being charged for the forwarding part of the call’ message, notifying user that a transfer is being made).
- Allow ES CallerID
- Allows a callee to see the call as if the current extension is making it.
- (ex. If this option is set to ‘Yes’ the callee will see the extension from which call is forwarded, otherwise it will see the original caller).
9. Follow Me
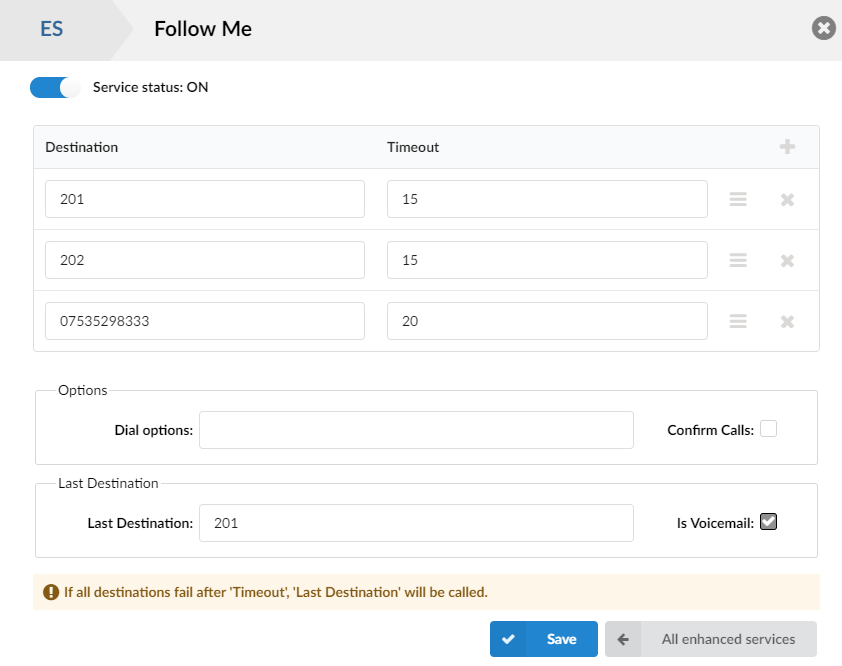
This service rings all the provided destinations in a top to bottom sequence. If the call is not answered by any of the provided extensions, it gets transferred to the ‘Last Destination’ extension, which can be a Voicemail box if ‘Is Voicemail’ option is selected.
TIP:
If placing calls to a mobile/Geo number it may take 2-3 seconds until the call is placed over the GSM network.
- Destination
- Local extension or Geo/Mobile numbers to be dialled, multiple fields can be configured by pressing the + key, numbers are prioritised from top to bottom.
- (ex. 1005, 1006, 07525829629)
- Timeout
- Destination Ring time in seconds.
- (ex. The time in seconds that destinations will ring. If the call is not answered during this period, it gets transferred to the next priority number).
- Dial Options
- Additional dial options when calling the Destination(s) (See dial options article for full list of Dial options)
- Confirm Calls
- With this option enabled you can make sure that the call is answered by a person, not a voicemail. (e.g. If the call is answered by a mobile phone the person picking up the call needs to press 1(or another key on the phone) to answer the phone. If that key is not pressed all phones will keep ringing because call is considered unanswered.)
- Last Destination
- The last destination number or “Overflow” number dialled if none of the ‘Priority’ numbers answers the call.
- (ex. Set this field to 1005. If none of the extensions answer, extension 1005 is dialed).
- Is Voicemail
- Select whether or not the Last Destination is a Voicemail box.
- (ex. Yes)
10. Group Hunt
When the called number picks up, the system will ask if the user wants to accept the call or reject it. If user accepts the call that was already answered by someone else, system will play the message which notifies the user about said situation.
TIP:
If placing calls to a mobile/proper number it may take 2-3 seconds until the call is placed over the GSM.
Configurable fields:
- Destination
- Local extension Geo/Mobile number(s) to be dialled.
- (ex. Enabling this option for extension 1005 and setting some Destinations will ring them all for the amount of time set in the Timeout field).
- Suspend
- Suspend the destination from the group.
- (ex. e.g. If you check this option for extension 1005, it will be no more a part of the group hunt).
- Timeout
- Ring time in seconds, once this has been exceeded the call will overflow to the “Last Destination”
- Dial Options
- Additional dial options when calling the Destination(s) (See dial options article for full list of Dial options)
- Confirm Calls
- With this option enabled you can make sure that the call is answered by a person, not a voicemail. (e.g. If the call is answered by a mobile phone the person picking up the call needs to press 1(or another key on the phone) to answer the phone. If that key is not pressed all phones will keep ringing because call is considered unanswered.)
- Last Destination
- The last destination number or “Overflow” number dialled if none of the ‘Priority’ numbers answers the call.
- (ex. Set this field to 1005. If none of the extensions answer, extension 1005 is dialed).
- Is Voicemail
- Select whether or not the Last Destination is a Voicemail box.
- (ex. Yes)
11. Mobile Numbers
12. Speakerphone Page
Speakerphone Page can be used to page multiple pre-set extensions through an access code. This function is also available through the use of Paging groups
- Enter extensions here
- This service enables the message to transmit to multiple phones by dialling ‘*399’ or single phone by dialling *400 ext.
- Example setup:
- Set the extensions field to ‘1000,1001,1002’ and dial *399. Extensions 1000,1001,1002 will be paged. If the handset type supports it, the call will automatically go to the speakerphone, otherwise it will just ring.
- Example 2:
- Set this field to ‘1000,1001,1002’ for example. Now dial*400 1001. Extensions 1001 will be paged. If handset type supports it, the call will automatically go to the speakerphone, otherwise it will just ring.
- Quite mode
- Does not play beep to a caller. Normally you won’t use this, but if you have an external amplifier that provides its own tone, you may want to set this option.
TIP: Phones by default have 10 seconds to auto answer.
13. Speakerphone Page Groups
Speakerphone Page Groups service enables permissions for a specific extension to page multiple extensions by dialing the ‘*600’ access code.
This setting relates to “Paging groups”
(ex. Dial *600 + paging group extension number to page all extensions assigned to this paging group)
14. Directory / BLF List
The Directory/BLF list is used to set up Busy lamp field keys to monitor and pickup calls on system extensions and Speed dial keys used to dial set numbers (external/internal) on a users handset. Once a key is programmed here, the relevant selection will be applied to the handset in a few seconds.
Tip: System extension such as Parking bays (701,702,703,704,705) can be used as BLF entries so that the status can be monitored and calls can be picked up by pressing the key..
Note: The handset type being used must be auto-provisioned and supported with an internal UAD to support this feature.
15. Speed Dial
The Speed Dial service allows you to assign short code (up to 3-digits) to numbers you frequently dial so the user doesn’t have to type the full number every time. To use Speed Dial, the user would first dial *130 and then the short code that relates to the full number, for example *130200.
Uploads are available through CSV upload. A template is available to assist with formatting.
CSV Download is used when you want to download the already set Dial Codes in CSV file.
16. Instant Recording
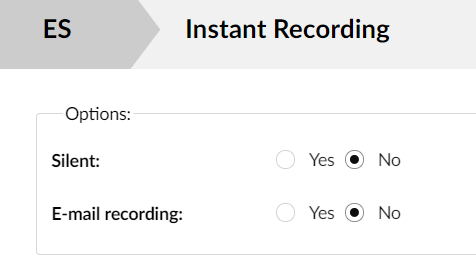
This service enables instant call recording which can be started anytime during the conversation, by dialing *159.
- Silent
- Should parties in conversations be informed that calls are being recorded.
- (ex. With active ‘Instant Recording’ service, dial *159 anytime during the active call. From the point when you dial this code, the call will be recorded).
- E-mail recording
- With this option you can allow the system to send each recorded file that was activated with Instant recording *159 on the e-mail of the extension that has activated it.
17. Delete Recordings

This service enables the user to delete recorded calls via the self care portal. For example, with this option enabled, the user logs into self care, navigates to ‘CDR’, selects the recorded message and clicks on ‘Advanced: Delete Recordings’
For info on how to access the self care portal see this article:
18. Listen to Recordings
This service allows user to listen recorded calls by downloading them from Online Self Care portal or by dialling access code *159 on your phone and then pressing numbers 1-9 for the last 9 recordings, 1 being the newest.
For example, with this option enabled, the user logs into Self Care, navigates to ‘CDR’, selects a recorded message, and clicks on ‘Listen’ button. The selected sound file will be downloaded to the local computer from where it can be played in your preferred audio player. To listen for last 9 recordings on your extension, dial *170 from your phone and then enter number between 1-9 to play the recording, where pressing 1 would play the last call recording and 9 would play the oldest.
For info on how to access the self care portal see this article:
19. Remote Access
This service enables users to access the system from remote locations. For example:
- Set one of the Destination fields in IVR to Remote Access. Set its accompanying Extension field to Destinations(if you want to call remote numbers). Save IVR.
- Edit the Enhanced Services of the extension that you want to authenticate as, and enable Remote Access. Click on Save and then on Edit next to that option.
- You can authenticate by CallerID that you can set in that list, and additionally ask for PIN of that extension, or if you want any CallerID you can leave that field empty and click on Require Extension PIN field to just authenticate by extensions PIN.
- In addition, you can set the timeout and outgoing dial options that are used when dialing a number.
20. Call Monitoring
This service monitors active calls in real time and can be useful for scenarios where call barge in or silent call monitoring is required (e.g training or supervising calls)
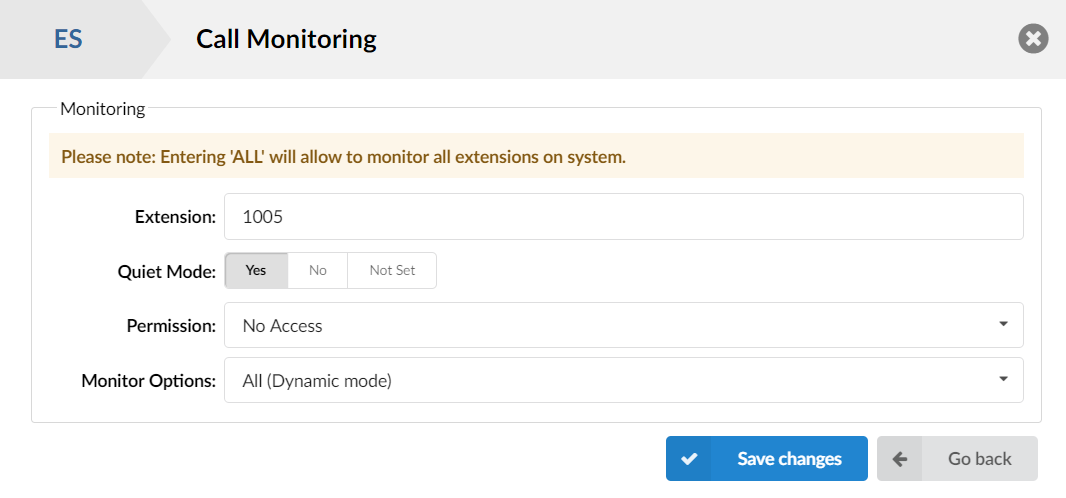
An example , extension 1000 is on a call. Extension 1005 dials ‘*199 1000’. From that moment, the active call and all other calls made by extension 1000 will be monitored by extension 1005, until 1005 hangs up.
There are three monitoring types available;
Listening – user can only listen to the calls
Whispering – user can listen to the conversation and talk only to the monitored extension
Barging – user can listen and talk to both parties on call
Dynamic mode – dynamically choose what mode of monitoring you want to use by pressing a key (default is Listening only)
-
-
- 4 – Listening
- 5 – Whispering
- 6 – Barging
-
- Extension
- Extension number that is to be monitored. If you wish to monitor extension 1000, just provide the extension number here.
NOTE: By typing ‘ALL’ in this field, you’ll be able to monitor all extensions
- Quiet Mode
- Select whether to play monitoring message or not
- Permission
- Sets the way the monitored extension is accessed
- Example:
-
- Access Granted – Monitor without providing PIN
- PIN Required – Ask for PIN before monitoring other extension
- No Access – Don’t monitor this extension, but leave it in the ‘Monitoring’ window.
-
21. System Operation Times
This parameter allows an extension to control operation times by using the Access code *401 and *402.
Note: Use with care, these access codes control operation times set on a tenant level (not accessible by standard admins). If Operation times are enabled with this method without prior parameters setup, inbound calls may not be processed correctly.
Have more questions? Submit a request


