Extensions – System – Adding/Modifying Extensions
Adding a new Extension

Step 1:
The procedure for adding a new system extension is divided into two steps. In the first step, the UAD/Phone type is selected. This UAD type selected needs to correlate with the handset type you are going to be using. The location for the handset will always be “Remote” as the system is hosted in the cloud. Local will be used if the handset and phone system is on the same network ( subnet )
For more information on UAD’s see below:
- TIP:
By default, a ‘Single Extension’ will be created. ‘Advanced Options’ offer the facility to add multiple extensions as well. For more information, check the ‘Extensions – Bulk upload’ article.
- UAD (User Agent Device)
Any devices ordered with the IPVoice Tenant will already be added to the system as an available UAD. If the UAD/Phone is not listed here, it needs to be added.
Step 2:
In the second step, basic Extension information is set (breakdown below)
- Extension
This field sets the extension number.
By default, this field is automatically populated, but can be changed to any Extension number within the tenant range. We recommend a four digit extension number on all tenants, as some 3 digit codes are linked to emergency services and system feature codes (e.g 700).
(ex. Setting ‘1001’ here will create a new system extension with the same network number.)
- Name
Full name and last name of the person using the Extension. This is the name that displays when internal calls are placed to other extensions and the name that shows on the handset itself.
Email address associated with the extension. This email will be used for the system welcome email, voicemail notifications, the username for the IPVoice Business app and used for various other system notifications.
(ex. Setting ‘andre@domain.com’ here will transfer all Voicemail notifications, Extension PIN and other details to this email)
- Department
Department to which extension will belong to. This is used to assign IPVoice app privileges and can be used to group extensions depending on which department they belong to.
The best practice is to set up the departments before creating extensions.
See the “Departments” Article for further information.
- Call Rating:
NOTE : After the extension has been created, you need to set call rating to ‘No’
This needs to be off for ALL extensions created on IPVoice. If this setting is left enabled the handset will not be able to make calls.
An email will be generated to the extensions email address if a call is attempted whilst this option is left on.
- Username
Username used by the Extension for the registration with the IPVoice Platform.
By default, this field is the Tenant number and Extension network number and cannot be changed.
(ex. In this case this value is set to ‘200101’).
- Secret
Secret/Password used by the Extension device for the registration with the IPVoice Platform.
By default, this field is automatically populated but can be changed.
(ex. 35LGMJax!v9a-0YR)
NOTE: IPVoice enforces strong password enforcement for secrets, which means that secret must meet certain criteria in order to be accepted otherwise, IPVoice will display an error message stating that secret is too weak.
Secret has to meet the following criteria in order to be accepted:
- It must be at least 8 characters long
- It must contain at least 1 uppercase
- It must contain at least 1 lowercase
- It must contain at least 1 digit
- It must contain at least 1 special character
- Allowed characters are: a-z, A-Z, 0-9, ! % * _ –
In order to make it easier for our users, we also implemented password generator, that will automatically generate strong password that meets above criteria with a single mouse click on a key icon located on a side of Secret field.
- User Password
Password used for IPVoice App registration (both Desktop and Mobile App, by default this field will be automatically populated.
The Password is sent in the welcome email of the extension if you press “Save & E-mail” on the extension settings).
TIP – Once the user changes their password this field will show “encrypted” so you cannot see the entry. This is very handy when troubleshooting app login problems, on first sign in to the app the apps force you to change this password, so it allows you to see if the user has logged in and changed their password.
- Show QR Code (Beside User Passwords)
Show QR Code button will display QR code that can be scanned with the IPVoice mobile application (built in QR reader). This feature will make mobile app setup and registration process as fast and simple as possible.
NOTE: Once you are registered to the IPVoice Platform with your IPVoice App you will be asked to change the automatically generated User Password in order to log in. Once this procedure is completed User Password will not be visible anymore and the QR Code button will be hidden.
- PIN (Personal Identification Number)
Four digit number used for account authorization for Voicemail, Agent log in and any PIN authentication set on the Enhanced services features.
Four digit number used for account authorization for Voicemail, Agent log in and any PIN authentication set on the Enhanced services features.
NOTE: This number must always be four (4) digits long
(ex. If the PIN for this extension is set to ‘3486’, provide it when asked for it by the IPVoice Platform when checking your Voice inbox, logging in as an agent in a queue or other Enhanced Services)
- Auto provisioning:
Set Auto Provisioning to ‘ Yes ‘. The will allow you remotely update the phone in the future, like BLF Keys.
- MAC Address
You need to enter a MAC Address for the users handset. This can be located on the user’s handset. If you don’t have a MAC Address at the moment, you can enter the username and 6 x ‘ 0 ‘
Example : 999101000000

TIP:
- Do not paste a value to the ‘Name’ and ‘Email’ fields, but please type it in. If these values are pasted, ‘Advanced options’ will need to be opened and the system will prompt for missing values.
- Once the extension is created, the ‘Save & Email’ button becomes available. This command sends the welcome email with the Extension details such as PIN, Extension number and app install instructions on the provided E-mail address.
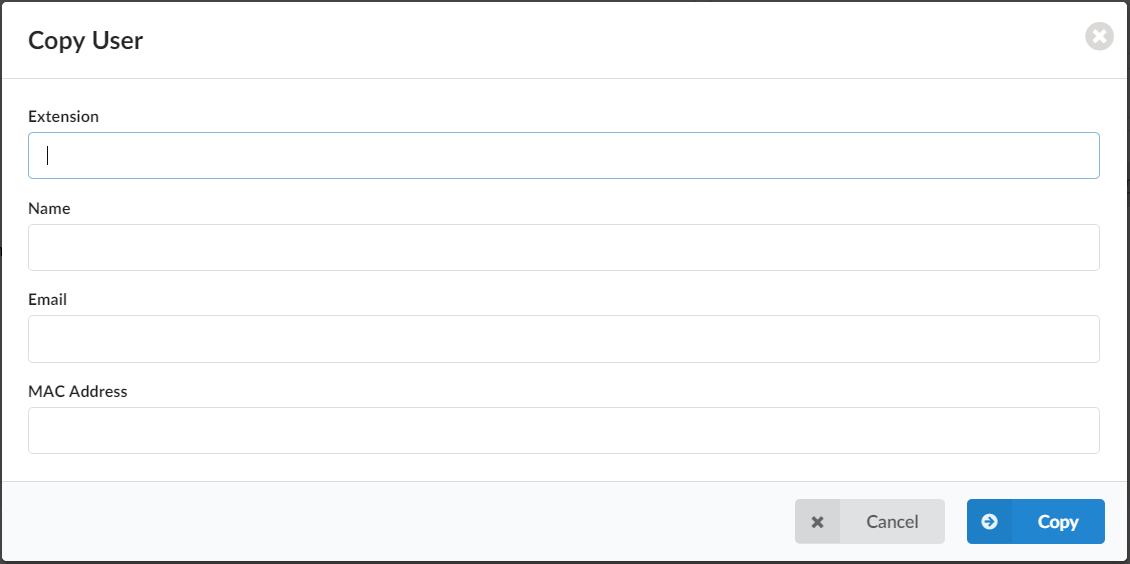
Copying an Extension:

“Copy As New”, an option to create a new extension by making copies of an existing extension’s settings such as call forwarding or ring timeout in order to speed up the process of adding new extensions to the system:
Pressing this key will bring up the fields for the new extension:
CSV Download of extensions
By clicking the CSV Download icon on the main System Extension page, you will be able to download CSV file that contains all the extensions already created on your tenant. This file can be used to import all the extensions, with their basic details, to a new IPVoice tenant, or for general admin purposes.
For information on bulk uploading Extensions:
Have more questions? Submit a request